Smoked brisket is truly the holy grail of barbecued foods. Learning how to smoke a deliciously tender, melt-in-your-mouth, sinfully delectable brisket is one of the most impressive skills one can master, and one that will make you tremendously popular come grill season. While this impressive culinary ability isn’t exactly difficult, it is time-consuming and requires a lot of patience and willpower. So, if you’re ready to embark on this delicious day-long endeavor, read on to learn how to smoke a perfect brisket.
Trim

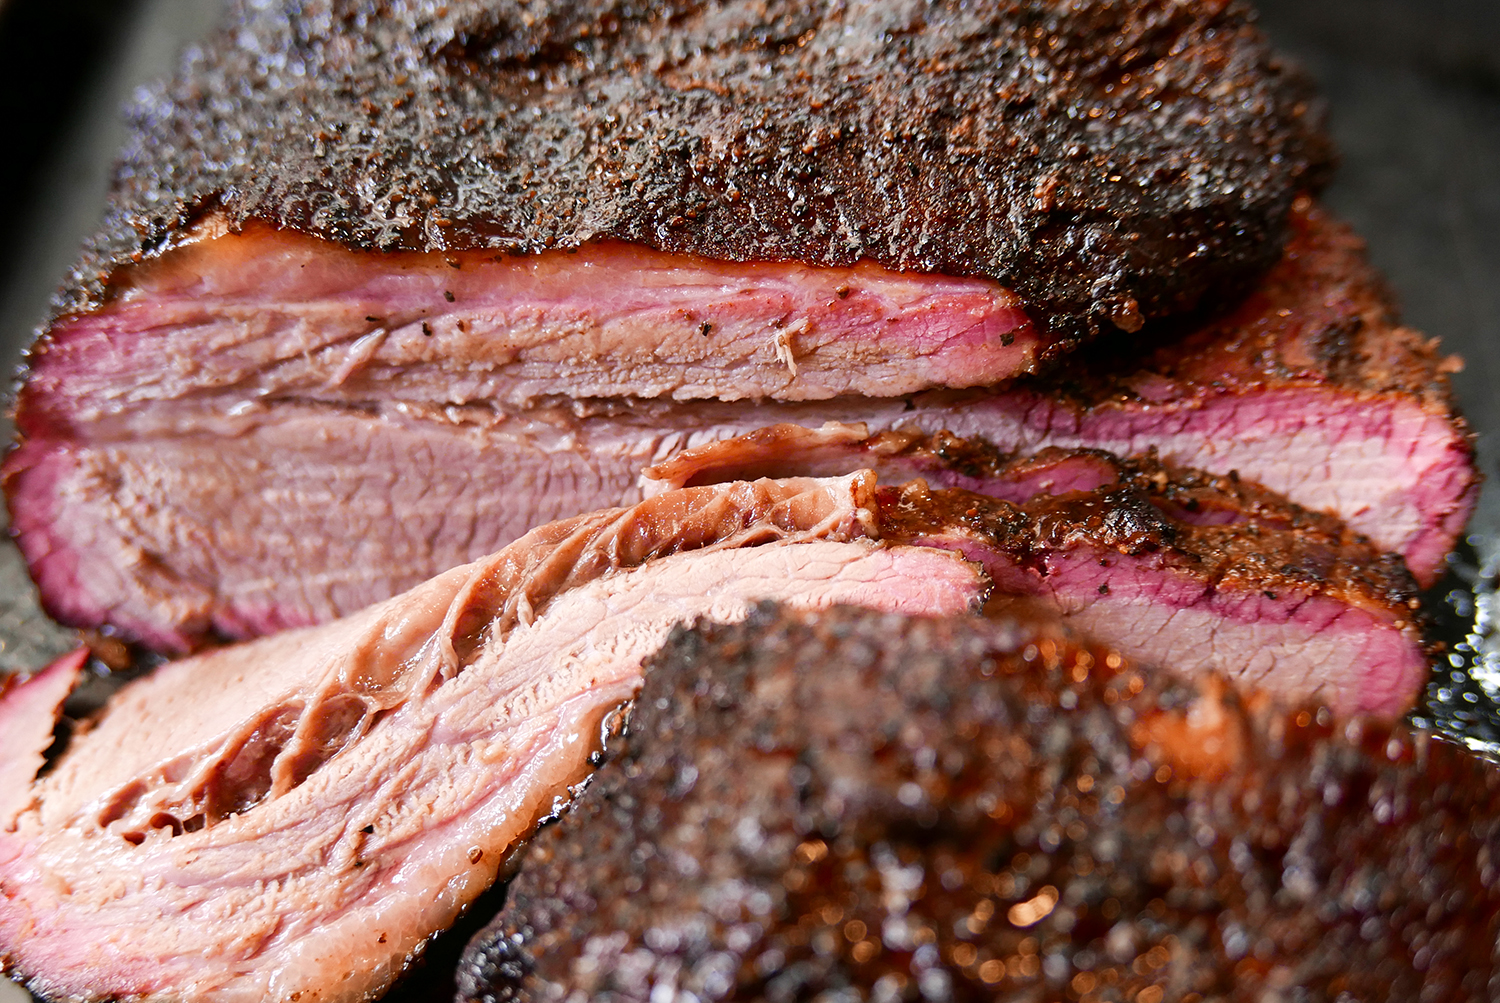
Trimming a brisket before it’s smoked is a crucial step to ensure a great bark and even cooking. Start by removing the brisket’s packaging and give the piece a good inspection. You’ll notice that the meat is most likely covered in lots of fat and silver skin. Using a large, sharp knife, carefully slice away the large, moon-shaped piece of fat at the point of the brisket. The goal here is not to remove this piece of fat entirely but to create a uniform shape to your meat for more even cooking. Continue to trim away the excess fat until the brisket is relatively uniform, taking care to not leave any excess pieces hanging around that will burn in the cooking process.
Season

While the brisket will take on a lot of delicious flavor from the smoking process alone, the bulk of the flavor will come from your seasonings. There’s nothing worse than spending all day lovingly smoking and tending to a brisket, only for its flavor to fall flat. Our best advice is to be both generous and classic with your seasoning, especially if this is your first time smoking a brisket. There’s nothing wrong with the simple combination of coarse salt and ground black pepper. A liberal amount of this classic combo will leave you with a delicious brisket. Though, of course, you can always experiment with additional spices like garlic and onion powder, corriander, paprika, and even coffee.
Once seasoned, your brisket is ready for the smoker.
Smoke

There is a lot of debate amongst pit masters when it comes to the best wood to use for smoking, and the choice is entirely up to you. We’re not here to start any fights. Not today, at least. Popular choices include mesquite, hickory, pecan, cherry, and post oak. Each of these woods give incredible, unique flavor and reliably even heat. It’s up to you to choose your favorite!
As with many great dishes, brisket takes time. While the experts can rush the process a bit and still achieve perfect tenderness and flavor, in our opinion, it’s best to go low and slow when smoking your brisket at home. Depending on your equipment, the smoker’s temperature should be set to just about 225F.
From there, follow the directions of your particular smoker. After setting the temperature, fill the water pan with about an inch of water and a few tablespoons of vegetable oil, then set the brisket inside the smoker with the thicker end facing the firebox. This is where the heat comes from, the the thicker side of the brisket will be better able to handle it without burning. If you’re using a thermometer, insert it into the brisket, taking care to ensure it is penetrating the meat itself and not a patch of fat. Close the lid of your smoker and find something to do for about three to four hours that will distract you from the temptation of checking on your brisket. Yes, the temptation will be real, but it’s crucial at this point for the smoke to work its magic, and disrupting this first smoke will have a major impact on your brisket’s outcome.
Spritz

At this point in the brisket smoking process, you have a choice to make. Some insist on keeping that smoker lid closed and never, ever, no matter what, opening it until at least 12 hours have passed. While we respect this method, we prefer to add a bit of moisture and flavor by spritzing the brisket between about the fourth hour and the time it’s ready to wrap – around the eighth hour.
Using a spray bottle filled with beef stock, lightly spritz the brisket every hour or so. This will keep the meat moist and help to develop a richer, deeper bark on the outside of the brisket.
Wrap

Once the brisket has reached an internal temperature of 165F, it’s time to wrap that baby up. True to brisket-smoking form, there is – shockingly – some dispute about the best way to do this. While the most common method is to use pink butcher paper – a material created specifically for this purpose – others prefer to simply use foil.
The foil method, also known as the Texas Crutch, is great for locking in moisture, as the foil does not absorb any of the brisket’s juices. Butcher paper, on the other hand, is much better at protecting the brisket’s bark and signature smokey flavor.
Whichever method you choose, the key is to wrap the brisket entirely, with no gaps exposing it.
Smoke…again

Once your brisket is wrapped, return it to the smoker and wait. And then wait some more. As we’ve already established, the key to a great smoked brisket is time, however painful it may be to wait. The timing will be greatly influenced by many factors – your smoker, the size of your brisket, your choice of wood, and method of wrapping you’ve used, to name a few – so giving a precise measurement of time for this step is nearly impossible. After what will likely be another four to six hours, the brisket is ready to pull from the smoker when it reaches 200F. Your thermometer should slide easily into the meat with zero resistance, indicating that it is perfectly tender and delicious. It should feel extremely soft to the touch, but be careful when testing it!
Rest

This is perhaps the most painful, torturous step in the whole day-long process. After you’ve pulled that gorgeous treasure from the smoker and carried it gingerly into your kitchen, it will surely fill your home with the most sinfully intoxicating aroma, teasing you with what’s to come. But despite that brisket’s siren song, it is absolutely vital that you do not dig into her just yet.
Resting any meat is a very important step, and this is especially true of smoked brisket. We’re sorry to say that it’s best to let the brisket rest for at least a full hour at room temperature before slicing. This will help the juices inside to settle and evenly distribute throughout the meat, making your efforts and long wait very worth your while.


