
EZ ICE is the Easy Way to Set Up Your Own Backyard Ice Rink

When the weather turns frigid, it’s  fun to find an ice rink and bat a puck around with friends. Usually, you’d have to turn to a crowded rink in a mall or a body of water and hope that it was frozen enough to withstand a couple hours of skating. With either option, you are never really in control of your own playing days.

A novel idea called EZ ICE is now available to help solve this problem. It’s a backyard ice rink that, like an above-ground pool, is surprisingly easy to set up.

ez ice
Image used with permission by copyright holder

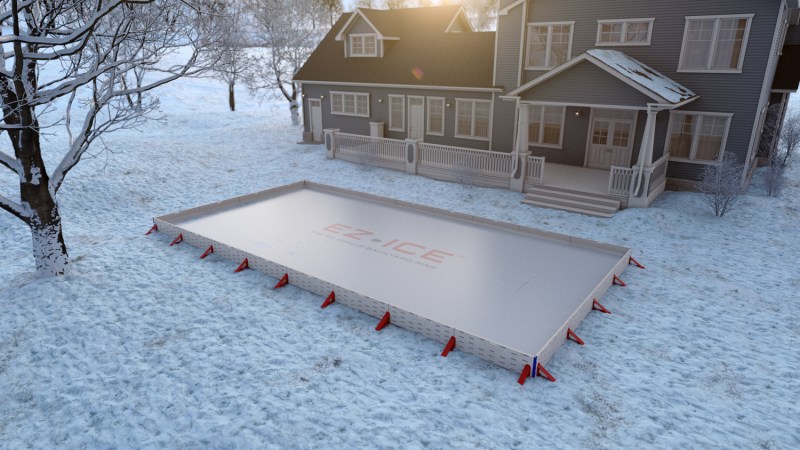
As long as you live in a frozen climate, you can have it up and running in about an hour. The best part? Everything you need to set it up comes in one kit, with no extra tools required. Five lightweight panels snap into place and are held together by strong, triangular brackets. The dimensions of the rink can be increased or decreased in increments of five feet to meet the shape of any backyard with no stake hammering required. EZ ICE can be set up on any flat surface, hard or soft.

Recommended Videos

When it comes time for water, a proprietary strap system helps even out liquid distribution across the playing surface (compensating for any angle up to 1 foot) and level weight on both sides. The liner is plain white to reflect as much sunlight as possible and keep the water frozen through the winter. This setup helps protect the surface underneath the rink and any utilities underground once the water begins to melt in the spring.

EZ ICE comes in nine sizes, with two custom options at the small and large ends of the spectrum. Sure, it’s an investment with starting prices around $1,000, but if your home is full of insatiable hockey enthusiasts, consider this the ultimate gift. (It’s a longer lasting investment than a trip to Toronto to visit the Hall of Fame, where Canada celebrates its national sport every day of the year.)

Topics
Geoff Nudelman
Former Digital Trends Contributor
Geoff is a former contributor to The Manual. He's a native Oregonian who’s always up for a good challenge and a great hike…
What to pack for a photography adventure
Top tips when hiking and photographing
Woman taking a photo in a snowy landscape

One of the best parts about going on an outdoor adventure is documenting it for your friends and family (and possibly the world) to see. To be honest, my trusty iPhone is pretty great at capturing awesome pics, but a lot of times, the moment calls for some professional gear. Professional equipment often has superior image quality, lens variety, and manual control settings that you wouldn't otherwise have at your disposal.

If you're looking to upgrade to professional equipment for your next outdoor trek, here's your packing list. Whether you're looking to take magazine-quality photos or just snap a couple good shots to hang in your office, this set of essentials won't turn you into an expert, like Chas Glatzer, but it will get you on the right path to being an adventure photography pro.
Choose your camera body

Read more
Microspikes vs. crampons: Understanding the right gear for icy trails
Ice, ice, maybe? When to use microspikes vs crampons
microspikes vs crampons inspire toud nnafqaychci unsplash

When winter hiking, one of the most essential pieces of gear will be your footwear. The right hiking boot can carry you comfortably for miles, but there are many cases where normal hiking boot lugs won't give you the traction you need. These cases become even more apparent during the wintertime when you're liable to slip on ice and dislocate your shoulder like one of my unfortunate family members — the nearest hospital was over two hours away. Microspikes and crampons can significantly reduce the risk of hospital visits while out in the winter wonderland, but how do you know which ones to pack? In this guide, we'll discuss microspikes vs crampons and how to stay safe.
Microspikes vs crampons: what's the difference?

Adventuring with microspikes
Microspikes are a flexible, rubber harness that goes over your hiking boot. The rubber is attached to several small chains that go underneath your foot, connecting multiple plates of short spikes to the bottom of your shoe. Think of it like the footwear version of tire chains. The microspikes themselves are generally a fourth of an inch to a half of an inch long, made of hardened steel. Short but sharp, these spikes are perfect for gripping packed snow and ice that might otherwise send you to the E.R.
Adventuring with crampons
Crampons are the spiked-collar version of microspikes. They have a similar rubber harness, but they will likely have additional rigid metal frames with longer spikes. The length ranging from three-fourths of an inch to even an astounding one and a half inches can look pretty intimidating once you have them strapped properly. Personally, I would resist the urge to practice karate kicks.
Choosing microspikes vs crampons
Microspikes are best for light snow, packed snow, and icy hiking trails. Ideal for winter hiking or trail running, these will serve you well on flat or moderate slopes. I love microspikes because they're lighter and less intimidating than crampons. They tend to be easier to put on and pull off, and even better, they're comfortable during long hikes.

Read more
How does Jones Shralpinist Outerwear handle subzero conditions?
Jones Shralpinist Outerwear tested in Vermont
Jones Shralpinist kit

It happens every winter in Stowe, Vermont. In mid to late January, deep winter sets in, bringing subzero temperatures and air like invisible ice. Overnight wind chills can reach -50 degrees, and the Green Mountains are covered in an alpine freeze. With each step, there’s a crunch of ice and snow, and the surroundings are almost silent as everyone tries to survive, let alone enjoy the snow globe setting.

But around 5:45 a.m. in late January, that’s just what I’m doing as I begin the drive to Stowe Mountain Resort. My car’s information display reads 9 degrees, and weather reports indicate a -21-degree wind chill on the mountain. Soon, I’ll be skinning up the Nosedive trail, a slow burn of roughly 2,000 vertical feet covering just over a mile. The wind will howl, and my quads will burn, and it’ll take focus and strain to make it up. I’ll be battling the cold, but also heat, as the climb takes me into my threshold heart rate and warmth builds inside. I’ll need gear suited for the task. 

Read more