This is the easiest way to tie a bowline knot

Learn how to tie the king of knots

Dress the knot and pull it tight.
Tom Kilpatrick / The Manual

Rightfully seen as the king of knots, knowing how to tie a bowline knot should be a part of every outdoorsman's knot repertoire. While it's quick to tie and can even be learned one-handed, the beauty of the bowline knot is that no matter what weight you put through it, you will always be able to untie it afterward. From hanging your hammock, making loops for tent stakes, and even anchoring a rope to a tree to create a handrail up a muddy embankment, the bowline can be used in any number of outdoor situations.

Recommended Videos

Difficulty

Easy

Duration

5 minutes

What You Need

  • Any kind of rope

The bowline is a simple knot to tie but can be easy to get wrong. Anyone who has learned it — or grown up in the boy scouts — may remember a whole load of confusion around a rabbit, a tree, and a hole. While there are various styles of bowlines and many methods you can use to tie them, we've stuck with the standard bowline knot and laid out the most straightforward, easy-to-remember method to tie it. This knot can be either freestanding or around an object, though it is often easier to tie it around a chair leg or branch when you're learning. Grab yourself a length of rope and learn to tie a bowline, the king of knots.

How to tie a bowline knot

Step 1: Make a loop in your rope with the working end over the top of your standing end. This loop is what's referred to as the rabbit's hole.
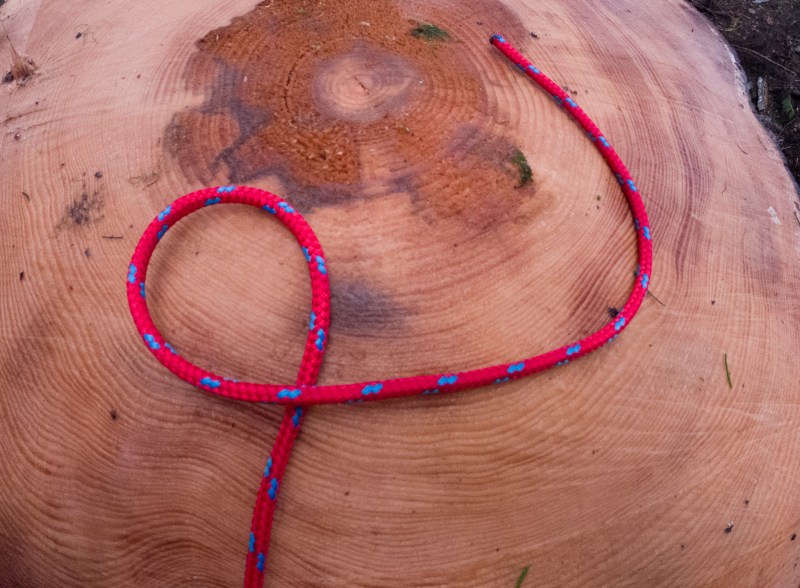
how to tie a bowline knot c dcim100goprogopr0752 gpr
Image used with permission by copyright holder

Step 2: Pass the working end of the rope up through the loop — the rabbit comes up out of the hole.
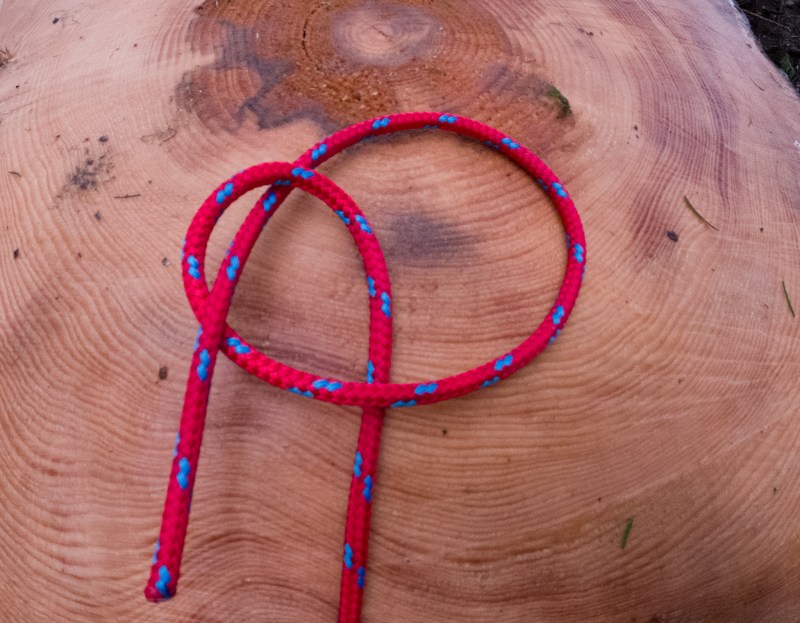
how to tie a bowline knot c dcim100goprogopr0754 gpr
Image used with permission by copyright holder

Step 3: Lead the rope around the back of the standing line — the rabbit goes around the tree.
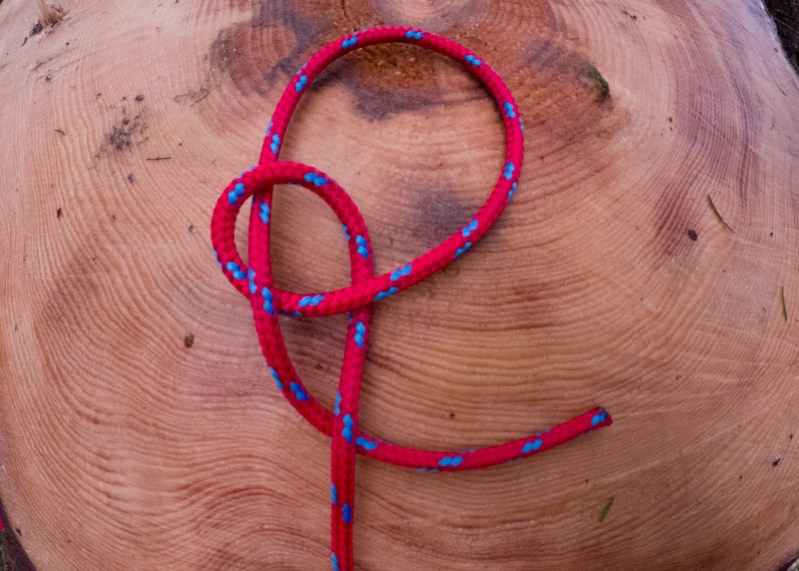
how to tie a bowline knot c dcim100goprogopr0756 gpr
Image used with permission by copyright holder

Step 4: Feed the working end back through the hole — the rabbit goes back into its hole.

how to tie a bowline knot c dcim100goprogopr0758 gpr
Image used with permission by copyright holder

Step 5: Dress the knot by pulling on all the two strands of rope that go through the loop, and the standing line, individually. Then pull all three individually to tighten your bowline.
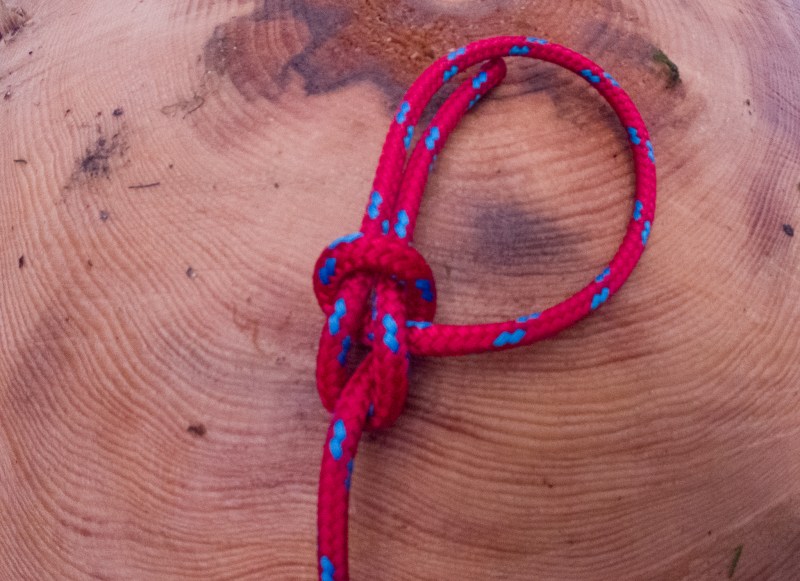
how to tie a bowline knot c dcim100goprogopr0760 gpr
Tom Kilpatrick / The Manual

Should you climb on a bowline knot?

The bowline was the go-to knot for rock climbers worldwide for many years when tying into their harness. More recently, though, it has been usurped by the double figure-eight knot, but why?

While the bowline has the major advantage that you can always untie it, even after it's been subjected to a heavy load, some drawbacks have caused climbers to move to the figure-eight. For a start, a bowline is only safe while under constant tension. When bounced, the knot can work its way loose and even untie. This means that the bowline has to be backed up with a stopper knot or tied as a Yosemite bowline, which involves an extra loop added around the knot. All of this adds in extra steps and the potential to tie your bowline incorrectly. Add to this the fact that many climbers see the bowline as being more difficult to recognize being tied incorrectly — when peer checking — and you have all the reasons for moving toward the figure-eight.

But does this mean that the bowline isn't safe? No, not at all. Plenty of climbers have been relying on the bowline for decades. If you're going to climb on it, though, be sure you know exactly what you're doing and be ready to justify why you don't want to use a figure-eight instead.

Practice the bowline until it becomes second nature, and you can recognize when it's tied incorrectly. While it's just one of many knots you will want to learn as an outdoorsman, the bowline knot is perhaps the most useful.

Topics
Tom Kilpatrick
A London-born outdoor enthusiast, Tom took the first ticket out of suburban life. What followed was a twelve-year career as…
Iveco’s Daily Switch is ready to work during the week, and play on the weekends
It's like an ultra-versatile, mobile Swiss Army rig for today's work-from-anywhere vanlifer crowd.
Iveco Daily Switch 4x4 Camper Van parked in a field with the pop-up roof opened.

The best camper vans are all about versatility. If you're a part of the WFA (that would be work from anywhere) gang, you need a mobile rig that you can live in, work out of, and use as a base camp for whatever outdoor adventures you're into. Few camper vans fill that niche, like Iveco's all-new Daily Switch 4x4.
Everything we know about the new Iveco Daily Switch 4x4 camper van

The new-for-2024 campervan was revealed at this year's Dusseldorf Caravan Show, and it's a beauty. The Daily Switch's simplicity is what sets it apart from most other models on the market, with an intentional "blank slate" design allowing buyers to trick out the interior in whatever way fits their adventurous lifestyle.

Read more
Winter camping made comfortable: Top tent heater tips and picks
Thrive while winter camping with our best tips and recommendations for tent heaters
Hiker relaxing in his tent with a great view of the snowy mountains

During winter camping, one of the primary concerns is staying warm, especially during those frigid nights. The temperature will often plummet to below freezing depending on where you're adventuring, so you'll need to get creative. One of the most effective ways to keep your tent cozy is to use a tent heater. However, there can be some safety risks. In this article, we'll explore some practical tips on how to choose the right tent heater, how to stay safe, and also some recommendations for a tent heater for winter camping.
How to choose the right tent heater

There are two main kinds of tent heaters: propane and electric. Propane heaters are popular because they have great heat output, and most models are easily portable. They don't require electricity, but they do require a good amount of ventilation in order to avoid carbon monoxide poisoning.

Read more
Layering outdoor clothing: Expert tips from a U.S. Special Operations Forces survival pro
Contrary to popular belief, building a fire should not be one of your first priorities for survival
Young man hiking through the mountains

Winter is on the horizon, and that means it's time to start layering up for your favorite outdoor activities. There's a lot of conflicting information out there about how to layer your clothing properly, so it's no surprise to us that the number one cause for outdoor rescues is a result of exposure. That's why we sought out one of the world's foremost survival experts: John Barklow.

As an experienced hunter, a backcountry skier, and an alpine climber, he was handpicked by the U.S. military to train Navy SEALS on how to survive the brutal winters of Afghanistan. He's also had a 26-year career in the Armed Services and was a Navy diver, so, to say the least, he is the expert. Here's what we learned from John Barklow about how to develop your outdoor clothing layering system like a pro.
John Barklow reveals how he came up with the perfect outdoor clothing layering system
U.S. Navy veteran and survival expert John Barklow John Barklow / Sitka Gear

Read more