
Learn to tie (and untie) a double figure-eight knot

One of the most useful and secure knots you can learn — every outdoorsman needs a figure eight in their repertoire

A fully tied figure-eight knot being rethreaded. Yellow and red rope tied around a stump on the grass.
Tom Kilpatrick/The Manual

As an outdoorsman, you should have a range of useful outdoor knots to call on at any time. The double figure-eight knot — also known as the figure eight loop knot — is perhaps the most secure knot you can tie. This knot is renowned among rock climbers as a replacement for the bowline when tying into a rope and is preferred because it doesn't risk untying itself if you leave it in situe.

Recommended Videos

Difficulty

Easy

Duration

10 minutes

What You Need

  • Any type of rope

The double figure-eight knot has almost endless uses for the everyday outdoorsman, from tying down guy lines on a tent, hanging a bear bag with a carabiner, tying your kayak to the roof of your car, or just being used as a stopped to prevent a rope sliding through a cleat. The figure eight is a useable knot for tying a mid-line loop as well, but you're better off with the alpine butterfly if you want to load either end of the line.

There are two ways to tie a figure 8 knot. You can either tie it on a bight — leaving you with a closed loop ready for a carabiner — or you can rethread your figure eight for tying directly around an object. Here's how to do both.

Tying a double figure-eight knot on a bight

The double figure-eight knot on a bight is a quick and easy way to create a secure loop. The figure eight loop knot on a bight is useful for creating a loop to attach a carabiner to — for example for hanging a bear bag — or at the end of a guy line to attach your tent peg to.

Step 1: Lay out a bight of rope on the grass. You will need each end of the loop to be several inches long to ensure you have enough rope to tie your double figure eight.

A bight of yellow and red rope on the grass
Tom Kilpatrick/The Manual

Step 2: Make a loop using the bight. Take the working end of your bight over the top of the standing end.

A bight of rope on the grass, laid out in a loop
Tom Kilpatrick/The Manual

Step 3: Take the working end of your rope around the back of the loop.

A bight of rope tied into a loop laid out on the grass.
Tom Kilpatrick/The Manual

Step 4: Now feed the working end of your bight through the loop. At this point, your knot should look like a figure eight. If it looks more like a pretzel, you haven't wrapped around the loop far enough.

A fully tied double figure eight knot in yellow and red rope on the grass.
Tom Kilpatrick/The Manual

Step 5: Tidy up your knot and seat the rope properly. You should aim to have a tail of rope that is 2 to 3 inches long to keep this knot secure. Feed rope through the knot to adjust the tail and the size of the loop if necessary.

A fully tied figure eight in yellow and red rope on a grassy background.
Tom Kilpatrick/The Manual

Tying a rethreaded figure-eight knot

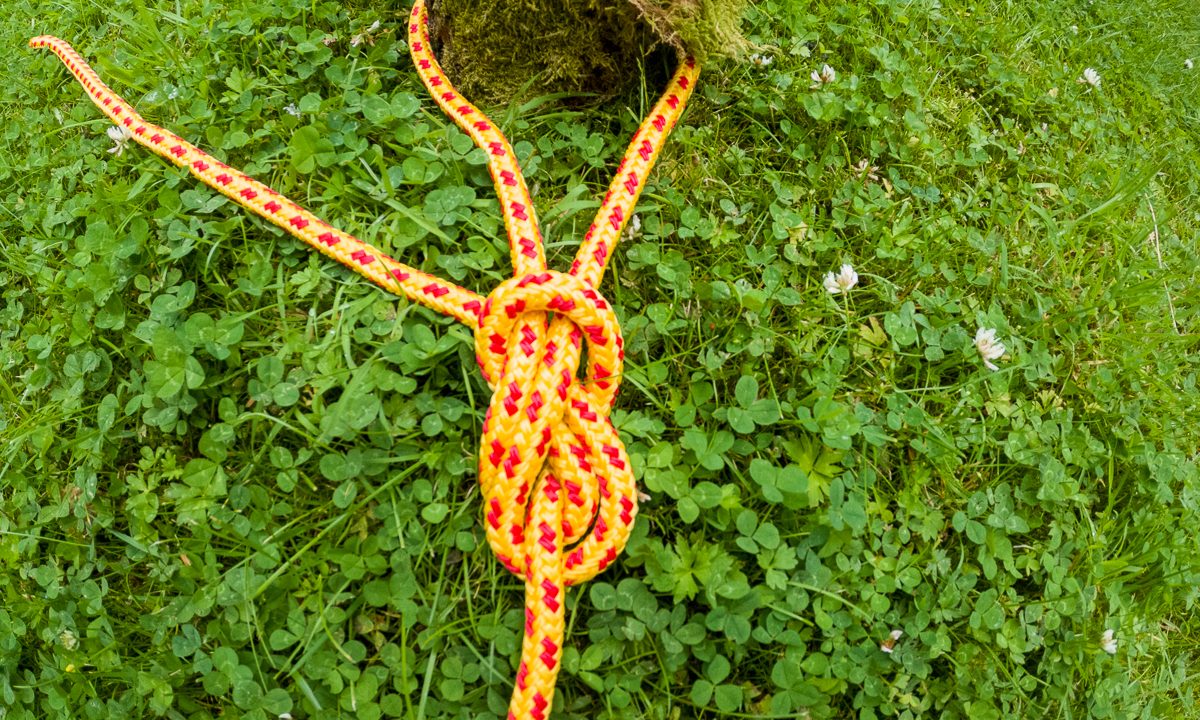
The rethreaded figure eight loop knot is used by climbers to tie into their harness. This eliminates the need for a carabiner and reduces the links in the chain — fewer links mean less likelihood that something fails. You can also use the rethreaded figure eight to tie around trees or poles, for securing tarps, hammocks, or anything else you want to keep secure.

Step 1: Tie a single figure-eight knot by following the steps above, but using a single end rather than a bight of rope. Ensure that your working end has a long enough tail to reach around the tree or pole and to retrace the knot.

A single figure eight tied in yellow and red rope laid on the grass
Tom Kilpatrick/The Manual

Step 2: Feed the working end around the tree or pole and begin to retrace the pathway of your figure-eight knot. This should be done in reverse, starting your rethreading at the point your working end left the single figure eight.

The start of rethreading a figure eight knot in yellow and red rope
Tom Kilpatrick / The Manual

Step 3: Continue to rethread your figure eight. Take care to follow the original knot closely - this can take some practice and you may get lost on the first few attempts.

A fully tied figure-eight knot being rethreaded. Yellow and red rope tied around a stump on the grass.
Tom Kilpatrick/The Manual

Step 4: Once you finish retracting your knot, ensure the ropes are all seated neatly and pull it tight. Feed rope through from either end to ensure you have a 2-to 3-inch tail at the end of your knot and that your loop is an appropriate size.

A double figure eight knot showing the load loop.
Tom Kilpatrick/The Manual

How to tie a figure-eight knot that is easy to untie

Mention tying a figure-eight knot to anyone who has ever subjected this knot to a heavy load, and you'll get told how difficult it can be to untie. Fortunately, there's a secret to success that can turn this highly secure knot from a 5-minute struggle into an easy untie once you're finished using it.

The key is in what is referred to as the load strand — shown highlighted in the photo. The load section of your rope — to take a climbing example — is the majority of your rope itself, the section that would run up through a carabiner and down to a belayer if you were rock climbing.

The load loop is the final loop in the knot before this length and is the section subjected to the greatest immediate force as your figure-eight knot is loaded. This loop should be on the inside of the knot as above rather than outside the strand leading to the tail. This setup means that as your knot is subjected to force, it doesn't cinch in on itself and leaves you a looser end to start untying from.

How to untie your figure-eight knot

There are simple steps to untie your knot easily:

  • As well as the above, make sure your knot is dressed properly — the knot should be neat without strands crossing over one another — and pull all four ends individually to make sure forces are applied equally.
  • Break the back of the knot. Try to bend and wiggle the knot from the midpoint to get some movement into the rope before you start just pulling.
  • Feed rope into the knot from either end. The more rope you can push into the knot itself, the looser things will become and the easier it will be to untie.

The figure-eight knot is one to spend time practicing so you know your knot is going to be seated properly and easy enough to untie. Next time you need a secure knot to leave in situ overnight, or to leave while you're away, pull out the figure eight.

Tom Kilpatrick
A London-born outdoor enthusiast, Tom took the first ticket out of suburban life. What followed was a twelve-year career as…
Try these lunch ideas the next time you go backpacking
Got a rumbling tummy on the hiking trail? Try one of these backpacking lunch ideas
Hiker with a backpack in front of a mountain lake background

Trail mix has to be one of my personal favorite snacks while backpacking. That said, you can't live on it, especially when you're hiking for miles every day. I'll be honest — dinner is my favorite meal while out on the trail, mostly because there's a higher chance that I can start a safe fire and simmer something delicious. Lunch, however, has been a challenge. Not only do backpacking lunches have to be delicious and satisfying, but they also need to be easy to prepare. Hopefully these backpacking lunch ideas will help.
Things to consider for backpacking lunch ideas

When planning backpacking lunch ideas, it's more important than ever to choose foods that are nutritious, lightweight, nonperishable, high in energy, and most importantly, easy to prepare. You might not have access to a campfire while you're out backpacking, so here are a few considerations to keep in mind.
Easy preparation
I love preparing a hearty meal while backpacking or camping, but not during prime daylight hours when I could be making better time. That's why I always reach for easy-to-prepare meals. Sometimes, I even do a lot of the prep work while I'm still at home. That way, all I need to do is find a nice view.
Weight and packability
I've made the mistake of packing a huge cooler with sandwiches. Not only do you have to lug the entire thing up the mountain, but you've got to bring it down, too. Plus, on a multiday backpacking trip, no ice pack is going to last that long. Be careful that the food you take is lightweight, and avoid foods that require excess packaging or bulk.
Caloric density
Since backpacking is a high-energy sport, you'll want to select foods based on nutrients. High calories are one thing, but to get the most energy from your food, aim for a balance of carbohydrates, proteins, and fats. Make sure you're incorporating proteins so your muscles can repair after a long day of hiking.
Shelf stability
A lot of backpackers plan their trips for the summer, which means having to deal with the heat. This can definitely play a part in what kinds of foods you bring. Backpackers aim to bring as light as possible, so foods that don't spoil and don't need excessive cooking are going to be your best friend.
Our favorite backpacking lunch ideas

Read more
Why you need a good merino wool base layer
Here's how merino wool fits into your layering system
The best Merino wool clothing is soft, breathable, odor-resistant, and temperature-regulating.

In Nordic regions, they have an old proverb that says: There's no bad weather, only bad clothing. As it turns out, there's actually some truth to the saying! As someone who loves the winter, I've had my fair share of borderline-frostbitten toes, but ever since I discovered the merino wool base layer, I've been able to stay out longer than ever. Here's everything you need to know about merino wool base layers and how to make the most of your gear.

For those unfamiliar with the layering system, a base layer is the innermost part of your gear. Think long underwear and socks. After that, you'll wear an insulating mid-layer followed by a rain or wind-resistant outer shell. Believe it or not, the base layer is the most important layer because of moisture management. Fail to nail this step, and you're probably going to be shivering out there on your bucket list adventure far sooner than you'd like.
What is merino wool, and why do I need it?

Read more
How long can you go without food if you’re lost in the wilderness?
Rationing your supplies and how to find more while lost in the wilderness
Cast-iron skillet over campfire wood

In the U.S., about 600,000 hikers get lost in the woods every year, which is why I never venture into the outdoors without the proper permits, tools, and safety precautions. While I have been fortunate enough to never find myself in an extreme emergency situation, getting lost in the woods is a possible reality, even at our well-maintained national parks. If you've ever wondered how long can you go without food while lost in the wilderness, here's what you need to know.
How long can you go without food?

Due to ethical concerns, food deprivation beyond intermittent fasting hasn't been studied, but scientists from Medical News Today estimate that a person could probably survive between one or two months without food depending on several factors like hydration, age, and heath. How long you can go without food might vary, and it's going to take some math.

Read more