Learn to tie a square knot to secure loads when you’re out camping

Securing a bundle of wood, lashing up a backpack, or just tying your shoes, the square knot is essential

A reef knot is tied against a tree
Tom Kilpatrick / The Manual

The square knot is one of many useful knots that every outdoorsman should know for when they're in the backcountry. The square knot is a binding knot designed to connect two ends of a rope that are the same diameter and style. This means it works best with the same rope — tied around an object, for example — or, failing this, using the same type of rope to connect together. While a square knot is secure, it should never be entrusted with your bodyweight or a key load, as it can capsize and fail. But that doesn't mean that the square knot isn't a key outdoor knot.

Recommended Videos

Difficulty

Easy

Duration

5 minutes

What You Need

  • Any type of rope

Believe it or not, most people already know how to tie a square knot — or are at least close to it — thanks to years of tying your shoelaces. In reality, what most people use to tie a shoelace is a version of the granny knot, which is what we get when we don't quite tie a square knot properly. While the granny knot is a secure enough knot for a pair of shoelaces, if you learn to tie a square knot, you'll find that your boots won't come untied when you're pounding the trail. The square knot is flat and sits flush against whatever you're tying up, allowing you to tie it close up to your package and make sure your bind stays secure. Here's how to tie a square knot in six easy steps.

How to tie a square knot

Step 1: Hold the two ends of the rope in either hand. Place the left-hand end of the rope over the top of the right-hand piece.
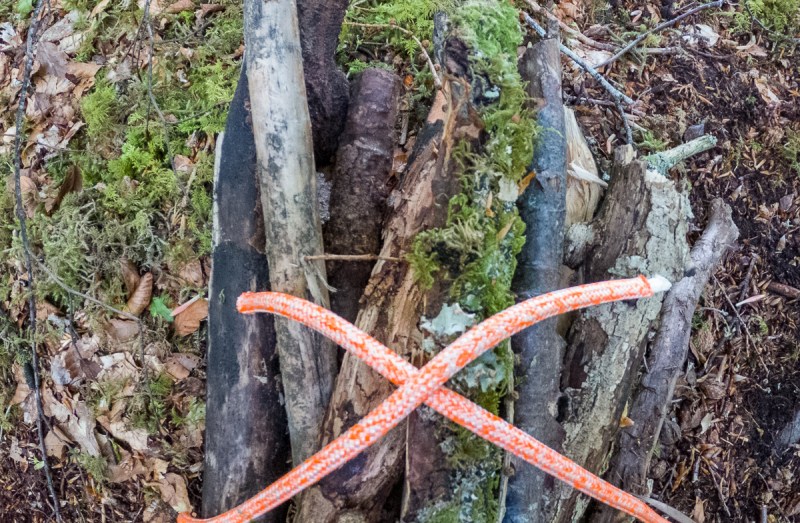
Step 1 of tying a square knot around a bundle of wood
Image used with permission by copyright holder

Step 2: Twist that same end under the right-hand piece of the rope.
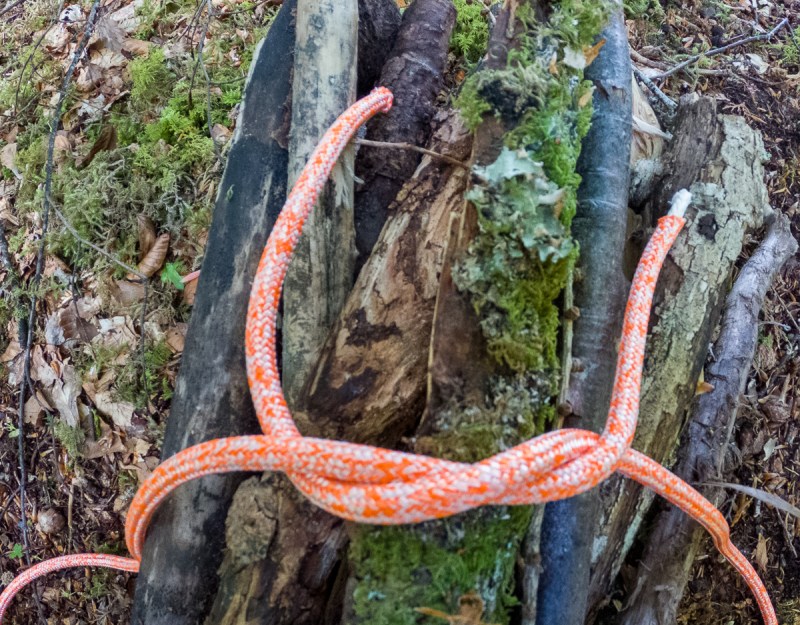
Step 2 of tying a square knot around a bundle of wood
Image used with permission by copyright holder

Step 3: Pull the rope tight around the bundle or package and keep some pressure on the working portion of the knot.
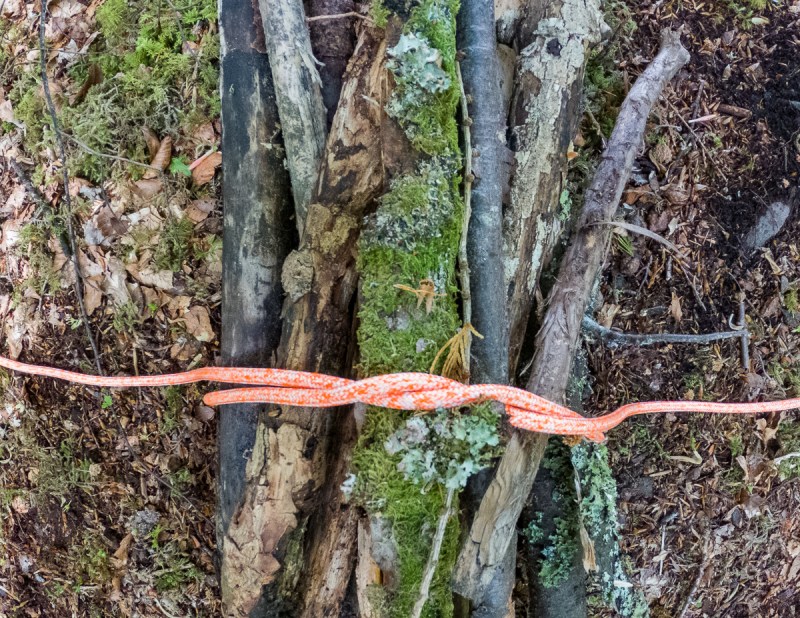
Step 3 of tying a square knot around a bundle of wood
Image used with permission by copyright holder

Step 4: Take both ends of the rope in your hands again and place the right-hand end over the left-hand piece.
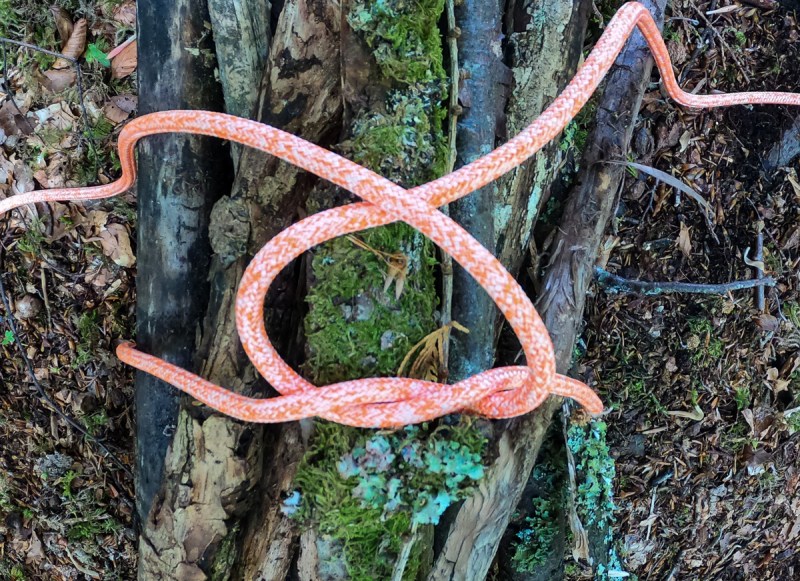
Step 4 of tying a square knot around a bundle of wood
Image used with permission by copyright holder

Step 5: Wrap the right-hand end under the left-hand piece of rope.
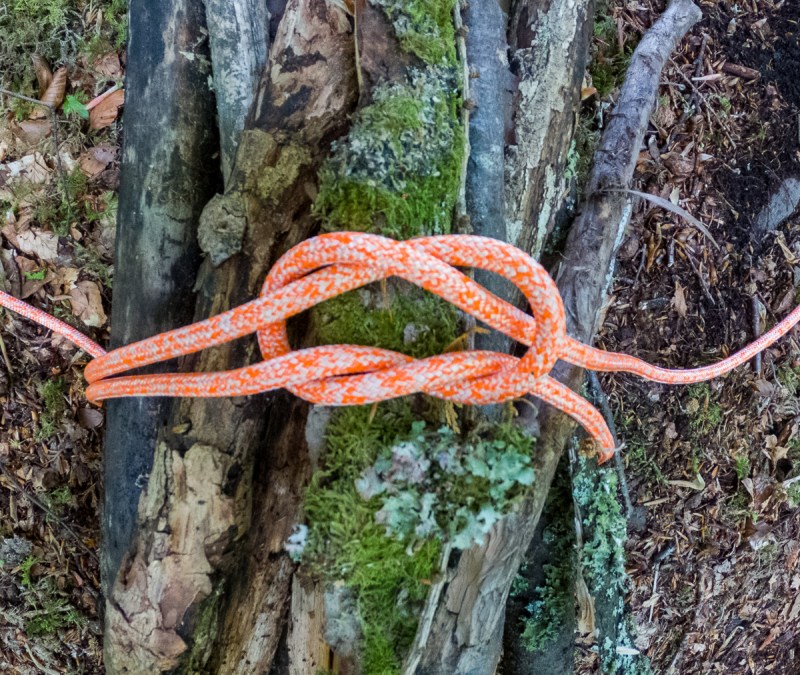
Step 5 of tying a square knot around a bundle of wood
Image used with permission by copyright holder

Step 6: Pull your square knot tight and ensure that it's seated correctly to prevent it from twisting over itself.
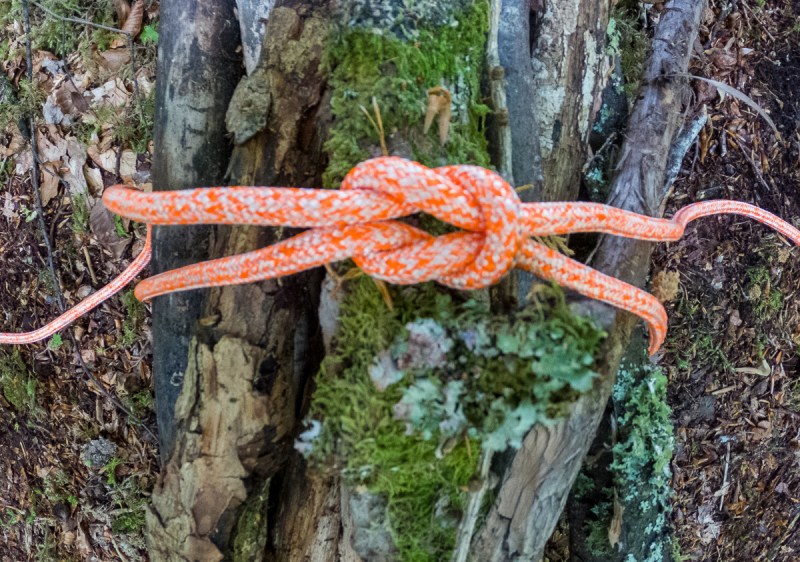
A finished square knot tied around a bundle of firewood
Image used with permission by copyright holder

When to use a square knot

As we said earlier, you shouldn't be using a square knot for any situation where you need to secure a heavy load or when loading the rope with your body weight. But there are situations where it's the perfect knot, and these are just some of the many outdoor uses for this knot:

  • Securing a cord of firewood. It's much easier to haul your wood collection back to your campsite if it's properly tied at either end, and the square knot is the perfect way to secure your load.
  • Tying the ends of a bandage together. Every outdoorsman should have a first aid kit and basic first aid knowledge. The square knot keeps the pressure on your wound and stems bleeding while you tie your bandage.
  • Tidying away camping gear. Once you've wrapped up your tarp, bedding roll, blanket, or even your tent, you need to secure them to stop your gear from unraveling in your bag or the trunk of your car. Use the square knot for a secure package.

Next time you tie your shoes in the morning, take a moment to remind yourself that you're practicing a valuable skill for the next time you're outdoors and remember, you're an outdoorsman every day of the week.

Tom Kilpatrick
A London-born outdoor enthusiast, Tom took the first ticket out of suburban life. What followed was a twelve-year career as…
Good news if you’re visiting Hawaii: This stunning attraction has reopened
This famous trail at Hawai'i Volcanoes National Park reopens after major upgrades
Lava at Hawai'i Volcanoes National Park

Sulphur Banks is one of the most visually striking areas in Hawaiʻi Volcanoes National Park. If you've never seen the yellow sulfur crystals on dark lava rocks, you're in for a real treat. Earlier this year, Sulfur Banks was closed for a maintenance project and was not expected to open until December. However, due to the trail crew's hard work, they wrapped up construction a month early.
Here's everything you need to know about the new upgrades to Hawai'i Volcanoes National Park

The Sulfur Banks Trail, also known as Ha'akulamanu, has reopened upon the project's completion, which included a complete replacement of the boardwalk, benches, and railings. This area of the park hasn't seen much TLC since 2000, so this was a welcome upgrade. The new boardwalk is made from yellow cedar, which is strong and weather-resistant to all manner of sun, rain, and heat, so the National Park Service expects it to last another fifteen or twenty years.

Read more
Layering outdoor clothing: Expert tips from a U.S. Special Operations Forces survival pro
Contrary to popular belief, building a fire should not be one of your first priorities for survival
Young man hiking through the mountains

Winter is on the horizon, and that means it's time to start layering up for your favorite outdoor activities. There's a lot of conflicting information out there about how to layer your clothing properly, so it's no surprise to us that the number one cause for outdoor rescues is a result of exposure. That's why we sought out one of the world's foremost survival experts: John Barklow.

As an experienced hunter, a backcountry skier, and an alpine climber, he was handpicked by the U.S. military to train Navy SEALS on how to survive the brutal winters of Afghanistan. He's also had a 26-year career in the Armed Services and was a Navy diver, so, to say the least, he is the expert. Here's what we learned from John Barklow about how to develop your outdoor clothing layering system like a pro.
John Barklow reveals how he came up with the perfect outdoor clothing layering system
U.S. Navy veteran and survival expert John Barklow John Barklow / Sitka Gear

Read more
Essential camping gear: The best power banks for your trip
Losing charge while out camping? These power banks will be just what you need
A man hiking to a mountain top

While you might not have service during your adventures, one of the worst things that can happen while camping is having your device run out of battery. Losing charge on your device could mean that you no longer have access to maps or other important resources, so it's important to pack a great power bank whenever you go camping. There are so many great options on the market today, so here's everything we look for in a great power bank for camping, as well as a few of our favorite recommendations.
What to consider when buying a power bank for camping

Capacity (mAh)
When out camping, you'll likely be away from an outlet for at least 48 hours. Buying a power bank that has a high mAh will be just the thing to keep all of your devices charged. To figure out how much capacity you'll need, estimate based on the capacity of your phone, GPS, and other gadgets. Generally one that is over 20,000mAh will suit your needs.
Portability
High-capacity power banks can be heavy, so if you're thinking about trekking through the woods with this brick, you'll want to purchase a power bank that is a portable weight and size. There are many compact designs on the market, and many of them are light weight.
Durability
Stuff happens when you're out in the wild, so you'll also want a power bank model that's durable. Opt for power banks that are shockproof, dustproof, and water resistant with a rating of IP65 or higher. Some also have options for protective casing, which can go a long way.
Charging speed
Fast charging is always nice to have, especially in an emergency. Look for power banks with Quick Charge (QC) or Power Delivery (PD) for faster charging. It's also nice if your power bank has multiple ports so you can charge more than one device at a time.
Temperature tolerance
If you're going camping in a super hot or cold climate, you'll want to invest in a power bank that can handle both extremes. Lithium-polymer batteries are generally better for extreme temperatures, so opt for that over a lithium-ion battery. For long trips in sunny areas, some power banks come with a built-in solar panel.
Here are the best power banks for camping
Anker PowerCore III Elite 25,600mAh

Read more